Avoiding Network Traffic Collisions with CSMA/CA
Wireless LANs use CSMA/CA to share the medium. The main difference from CSMA/CD is the CA - collision avoidance. Just as in CSMA/CD, the abbreviation CSMA/CA gives an idea of how it functions:
* Carrier Sense - Sensing the medium, in this case the air (or RF).
* Multiple Access - Many accessing the medium at the same time.
* Collision Avoidance - Avoiding collision that may occur on the medium during transmission.
Because wireless LAN devices have no way to detect collisions, the CSMA/CD access method is not an adequate solution for wireless LAN communications. If wireless LANs were to use CSMA/CD, collisions would occur at the wireless access point and all data would be lost. At this point, a transmitting device wold not know that it should retransmit the information because the receiving device would be unaware that a collision occured.
Instead of detecting transmission collisions, CSMA/CA uses mechanisms that attempt to avoid collisions. Although these mechanisms impose some overhead, the overall benefit is better data throughput because data collisions are minimized. This overhead occurs because devices have a countdown timer that requires them to wait a period of time before they are able to transmit again. This helps avoid collisions.
I've received my free Meraki AP18 after attending their webinar a month ago. There's a helpful guide on how to create your Meraki Dashboard and initially configure the AP which is just quick and easy to follow.

These are the contents of the box which includes the Meraki MR18 AP, power adapter, manuals, rack mounting brackets and screws.

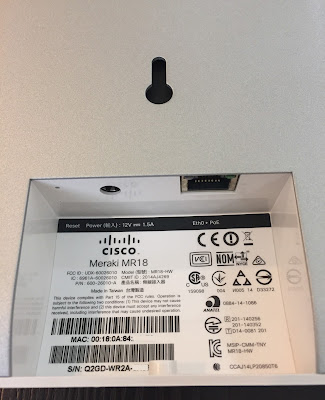
The Reset (factory reset), power, Eth0 (PoE) ports, MAC address and serial number sticker are found at the back. The back of the AP has an anti slip surface.
The Kensington lock (K-slot) is found on the left side of the AP.


Wireless LANs use CSMA/CA to share the medium. The main difference from CSMA/CD is the CA - collision avoidance. Just as in CSMA/CD, the abbreviation CSMA/CA gives an idea of how it functions:
* Carrier Sense - Sensing the medium, in this case the air (or RF).
* Multiple Access - Many accessing the medium at the same time.
* Collision Avoidance - Avoiding collision that may occur on the medium during transmission.
Because wireless LAN devices have no way to detect collisions, the CSMA/CD access method is not an adequate solution for wireless LAN communications. If wireless LANs were to use CSMA/CD, collisions would occur at the wireless access point and all data would be lost. At this point, a transmitting device wold not know that it should retransmit the information because the receiving device would be unaware that a collision occured.
Instead of detecting transmission collisions, CSMA/CA uses mechanisms that attempt to avoid collisions. Although these mechanisms impose some overhead, the overall benefit is better data throughput because data collisions are minimized. This overhead occurs because devices have a countdown timer that requires them to wait a period of time before they are able to transmit again. This helps avoid collisions.
I've received my free Meraki AP18 after attending their webinar a month ago. There's a helpful guide on how to create your Meraki Dashboard and initially configure the AP which is just quick and easy to follow.

These are the contents of the box which includes the Meraki MR18 AP, power adapter, manuals, rack mounting brackets and screws.

The Reset (factory reset), power, Eth0 (PoE) ports, MAC address and serial number sticker are found at the back. The back of the AP has an anti slip surface.


Before you plug the Meraki AP to the network, you need to first create a
Meraki Dashboard login account. Click Create an account.


A confirmation email will be sent to your registered email.

Once your email is confirmed, you can re-login to the dashboard and Add Devices to your
Meraki Cloud Dashboard by clicking Next.

I didn't receive an Order Number (for bulk order) so I've added my Meraki AP by
entering its serial number which can be found on the sticker at the back. Click Add Devices then Next.

Enter a Network name and click Create network. This would be your initial SSID.


To configure additional SSID and edit Access control policies, go to
Wireless > Configure > SSIDs.

I’ve re-configured the SSID Wireless Lab WiFi initially created to
Lagura which is the same SSID configured on my Linksys E1000. Click Save
Changes which is found at the bottom of the page.

Under the SSID, go to Access Control and click edit settings. I chose
WPA2 and typed the same pre-shared key used on my Linksys wireless router.

You can further customize the SSID policies such as WPA encryption mode,
Band selection and Content filtering, etc. Click Save Changes once done.

At this point you can connect the Meraki AP to the Internet.
The Status will change from GRAY (no connectivity) to GREEN.

The AP LED will be blinking BLUE which means it’s
downloading the SSID configurations from the Meraki cloud. It took just a couple of
minutes to finish the download. The status LED will turn steady GREEN afterwards. Here’s
a table for the LED indicators from Meraki’s website.


I initially connected the Meraki AP on my Linksys E1000 LAN
port in order to download its configuration from the Meraki cloud. Once there's connectivity (Status is GREEN), I've removed the Linksys E1000 and directly connected the Meraki AP
to the cable modem. By default, the Meraki AP Eth0 (WAN) interface is set to DHCP and wireless LAN is assigned with the 10.0.0.0/8 network using NAT mode.


Go to the Event log to see the associated wireless clients
and its MAC address.

Go to Tools and Select a tool on the drop-down option to perform basic troubleshooting within the AP.

My Meraki dashboard shows a license problem highlighted in RED but this can be
disregarded since my free Meraki AP promo allows a limit
of 1 AP per organization and per individual. Here’s a licensing FAQ for more
info.
