Cloud-based Architecture
Cisco Meraki is cloud-based and offers centralized management of wireless, switched, and security network built from Meraki products. For example, through the cloud networking service, you can manage APs, monitor wireless performance and activity, generate reports, and so on.
Cisco Meraki APs can be deployed automatically, once you register with the Meraki cloud. Each AP will contact the cloud when it powers up and will self-configure. From that point on, you can manage the AP through the Meraki cloud dashboard.
From the cloud, you can push out code upgrades and configuration changes to the APs in the enterprise. The Cisco Meraki cloud also add the intelligence needed to intruct each AP on which channel and transmit power level to use. It can also collect information from all of the APs about things such as RF interference, rogue or unexpected wireless devices that were overhead, and wireless usage statistics.
I've registered and took a webinar in Meraki's (Cisco) website in order to get my free Meraki AP. The process is just quick and you'll be sent a confirmation to your registered email afterwards. You'll also need to provide a mailing address where to ship the free Meraki AP.

Choose your preferred language, your region, and the Meraki solution or product you're interested in.

Choose the webinar and the schedule based on your country.

I've chosen the Introduction to Cloud Managed IT webinar. There are also other webinars available in Meraki's Youtube channel.


You'll get an email confirmation of the scheduled webinar and you could add it to Outlook calendar.

You could also register and explore the free demo Meraki (cloud) Dashboard.

You'll be sent a temporary username (your email) and password which is good for 30 days.


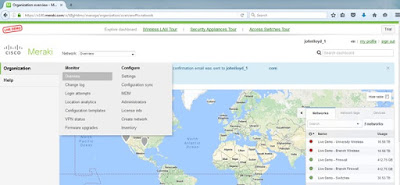
I've chosen the Wireless LAN Tour. There's also Security Appliances tour and Access Switches Tour available.


Below are screenshots under Wireless > Configure.


Cisco Meraki is cloud-based and offers centralized management of wireless, switched, and security network built from Meraki products. For example, through the cloud networking service, you can manage APs, monitor wireless performance and activity, generate reports, and so on.
Cisco Meraki APs can be deployed automatically, once you register with the Meraki cloud. Each AP will contact the cloud when it powers up and will self-configure. From that point on, you can manage the AP through the Meraki cloud dashboard.
From the cloud, you can push out code upgrades and configuration changes to the APs in the enterprise. The Cisco Meraki cloud also add the intelligence needed to intruct each AP on which channel and transmit power level to use. It can also collect information from all of the APs about things such as RF interference, rogue or unexpected wireless devices that were overhead, and wireless usage statistics.
I've registered and took a webinar in Meraki's (Cisco) website in order to get my free Meraki AP. The process is just quick and you'll be sent a confirmation to your registered email afterwards. You'll also need to provide a mailing address where to ship the free Meraki AP.

Choose your preferred language, your region, and the Meraki solution or product you're interested in.

Choose the webinar and the schedule based on your country.

I've chosen the Introduction to Cloud Managed IT webinar. There are also other webinars available in Meraki's Youtube channel.


You'll get an email confirmation of the scheduled webinar and you could add it to Outlook calendar.

You could also register and explore the free demo Meraki (cloud) Dashboard.

You'll be sent a temporary username (your email) and password which is good for 30 days.


I've chosen the Wireless LAN Tour. There's also Security Appliances tour and Access Switches Tour available.


To add a Meraki AP, click Add AP > click claiming (hyperlink) > add serial or
order number > click Claim.


Below are screenshots under Wireless > Configure.


No comments:
Post a Comment