You can use the following steps to configure a guest network. As you work through the steps, notice that the guest network requires a dynamic interface, a WLAN, and an authentication method - much like any other WLAN.
Step 1 - Create a dynamic interface for the guest WLAN.
Under Controller > Interfaces > New, define the dynamic interface, the VLAN ID, and the IP addressing information.
Step 2 - Create the guest WLAN.
Select WLAN > New to define a new WLAN, and then enter the profile name and SSID.
Step 3 - Bind the guest WLAN to the guest WLAN interface.
On the General tab of the WLAN, select the guest controller interface to be used. The dynamic interface does not matter on the foreign controller as traffic is sent to the anchor and its dynamic interface. If PSK authentication is used, only the foreign needs the PSK configuration. If external RADIUS authentication is used, only the anchor controller needs the RADIUS configuration. All other WLAN parameters must be identical on the anchor and foreign controllers; otherwise, the two controllers will conclude that their WLANs are different and so no tunneling should occur.
Step 4 - Configure the wireless security method.
On the Security tab, you can select the Layer 2 tab to choose a wireless security scheme to be used on the WLAN.
Step 5 - Configure web authentication.
Select the Security > Layer 3 tab, then choose Layer 3 Security type Web Policy. When the Authentication radio button is selected (the default), web authentication will be performed locally on the WLC. You will also need to define local usernames that will be used when guest users authenticate. Be sure to visit the QoS and Advanced tabs to complete the guest WLAN configuration.
Step 6 - Configure mobility anchors (for larger networks).
If you network consists of multiple controllers, you should configure guest WLANs on each one where guest users might connect. Be sure to configure them consistently. Then identify one controller that will server as a mobility anchor for all guest users hosted by other controllers. All of the foreign controllers (the ones you are configuring) should be configured in the same mobility group to allow roaming. The anchor controller does not need to be in the same mobility group because no roaming is expected between APs on the foreign controller and APs on the anchor. In fact, it is common proactive to purposely configure the anchor in a different mobility group to prevent any risk of roaming.
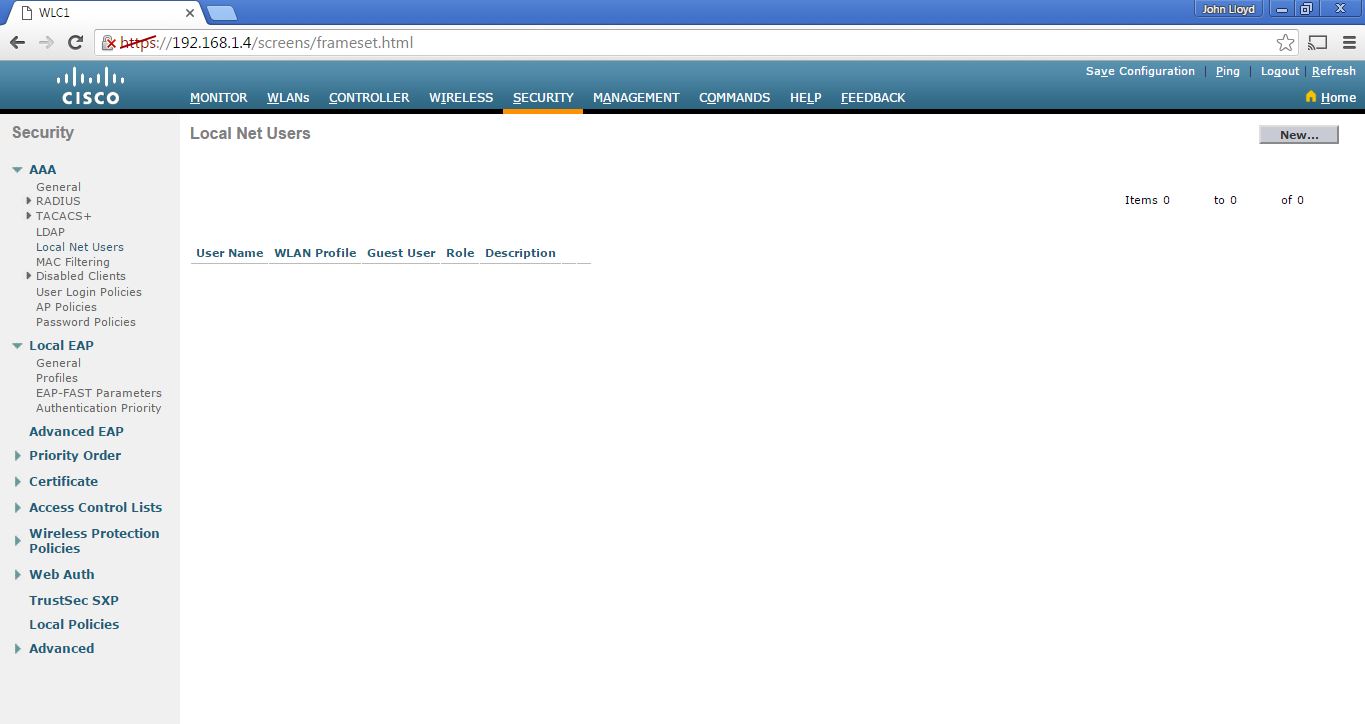
For my wireless lab, I've created some wireless guest networks, authenticated via local users created on the WLC and then used an external RADIUS server. To add local users on the WLC, go to Security > Local Net Users >New. You can choose which WLAN profile will use the local user database or just choose Any WLAN, which is the default.


I've created a separate SSID called GUEST-WIFI-LOCAL for testing purposes and isolating from SSID Lagura, which is the wifi used by my family at home.

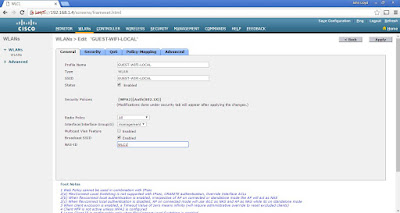
I chose None for Layer 2 Security and Web Policy > Authentication for Layer 3 Security.


I only chose LOCAL for the Order Used For Authentication under AAA Servers tab.

You can customize the Web Auth by going to Security > Web Auth > Web Login Page. You can redirect clients to certain URL after successful login and put a banner, disclaimer or an Acceptable Use Policy (AUP). You'll get message exceeded error if the message is too long so you'll need to edit your AUP template. There's a good AUP sample template from this link. You can preview the Web Auth page by clicking Preview (beside Apply).


A good and quick way to test the newly created SSID and its policy is to use a smartphone (iPhone in this case).


After successful login (john-local), I was redirected to the specified URL.

 You can verify wireless clients on the WLC by going to Monitor > Clients and click the MAC address or IP address of the client.


I've installed a free RADIUS server, WinRADIUS, which can run on a Windows machine. The installation is simple and you can follow a Youtube guide from on this link.

WinRADIUS will initially ask you to allow or run the application on the Windows firewall setting.

You'll also need to initially run the WinRADIUS database by going to Settings > Database > Configure ODBC automatically > click OK. The log will ask you to restart WinRADIUS and you can do this by just closing and opening it again.


You can change the WinRADIUS shared secret (to configure the same on WLC) and IP address by going to Setting > System > OK.

You can add RADIUS server by just clicking the + (plus) sign and type the username and password.

You can perform a quick test by opening RadiusTest from WinRADIUS folder. Just type the RADIUS IP, Secret, User name and Password then click Send. The RADIUS log #5 indicated the authentication (john-rad) was OK.

You can add a RADIUS server on the WLC by going to Security > RADIUS > Authentication > New. Type the RADIUS server's IP address and shared secret and click Apply.


You can do a quick ping to the RADIUS server by clicking on the blue arrow and choose Ping.


I created a separate SSID GUEST-WIFI-RADIUS using the same Layer 2 and Layer 3 Security (and Web Auth) policy. Choose the created RADIUS server from the drop-down option under AAA Servers. I only specified RADIUS for the Order Used For Authentication. You can optionally add another authentication policy (using left and right arrow buttons) as a fallback method.


I verified the SSID GUEST-WIFI-RADIUS if the policy is working using my iPhone.


I also verified on the RADIUS server log (log #6) if the user (john-rad) was successfully authenticated.

Step 1 - Create a dynamic interface for the guest WLAN.
Under Controller > Interfaces > New, define the dynamic interface, the VLAN ID, and the IP addressing information.
Step 2 - Create the guest WLAN.
Select WLAN > New to define a new WLAN, and then enter the profile name and SSID.
Step 3 - Bind the guest WLAN to the guest WLAN interface.
On the General tab of the WLAN, select the guest controller interface to be used. The dynamic interface does not matter on the foreign controller as traffic is sent to the anchor and its dynamic interface. If PSK authentication is used, only the foreign needs the PSK configuration. If external RADIUS authentication is used, only the anchor controller needs the RADIUS configuration. All other WLAN parameters must be identical on the anchor and foreign controllers; otherwise, the two controllers will conclude that their WLANs are different and so no tunneling should occur.
Step 4 - Configure the wireless security method.
On the Security tab, you can select the Layer 2 tab to choose a wireless security scheme to be used on the WLAN.
Step 5 - Configure web authentication.
Select the Security > Layer 3 tab, then choose Layer 3 Security type Web Policy. When the Authentication radio button is selected (the default), web authentication will be performed locally on the WLC. You will also need to define local usernames that will be used when guest users authenticate. Be sure to visit the QoS and Advanced tabs to complete the guest WLAN configuration.
Step 6 - Configure mobility anchors (for larger networks).
If you network consists of multiple controllers, you should configure guest WLANs on each one where guest users might connect. Be sure to configure them consistently. Then identify one controller that will server as a mobility anchor for all guest users hosted by other controllers. All of the foreign controllers (the ones you are configuring) should be configured in the same mobility group to allow roaming. The anchor controller does not need to be in the same mobility group because no roaming is expected between APs on the foreign controller and APs on the anchor. In fact, it is common proactive to purposely configure the anchor in a different mobility group to prevent any risk of roaming.
For my wireless lab, I've created some wireless guest networks, authenticated via local users created on the WLC and then used an external RADIUS server. To add local users on the WLC, go to Security > Local Net Users >New. You can choose which WLAN profile will use the local user database or just choose Any WLAN, which is the default.


I've created a separate SSID called GUEST-WIFI-LOCAL for testing purposes and isolating from SSID Lagura, which is the wifi used by my family at home.


I chose None for Layer 2 Security and Web Policy > Authentication for Layer 3 Security.


I only chose LOCAL for the Order Used For Authentication under AAA Servers tab.

You can customize the Web Auth by going to Security > Web Auth > Web Login Page. You can redirect clients to certain URL after successful login and put a banner, disclaimer or an Acceptable Use Policy (AUP). You'll get message exceeded error if the message is too long so you'll need to edit your AUP template. There's a good AUP sample template from this link. You can preview the Web Auth page by clicking Preview (beside Apply).


A good and quick way to test the newly created SSID and its policy is to use a smartphone (iPhone in this case).


After successful login (john-local), I was redirected to the specified URL.


I've installed a free RADIUS server, WinRADIUS, which can run on a Windows machine. The installation is simple and you can follow a Youtube guide from on this link.


You'll also need to initially run the WinRADIUS database by going to Settings > Database > Configure ODBC automatically > click OK. The log will ask you to restart WinRADIUS and you can do this by just closing and opening it again.


You can change the WinRADIUS shared secret (to configure the same on WLC) and IP address by going to Setting > System > OK.

You can add RADIUS server by just clicking the + (plus) sign and type the username and password.

You can perform a quick test by opening RadiusTest from WinRADIUS folder. Just type the RADIUS IP, Secret, User name and Password then click Send. The RADIUS log #5 indicated the authentication (john-rad) was OK.

You can add a RADIUS server on the WLC by going to Security > RADIUS > Authentication > New. Type the RADIUS server's IP address and shared secret and click Apply.


You can do a quick ping to the RADIUS server by clicking on the blue arrow and choose Ping.


I created a separate SSID GUEST-WIFI-RADIUS using the same Layer 2 and Layer 3 Security (and Web Auth) policy. Choose the created RADIUS server from the drop-down option under AAA Servers. I only specified RADIUS for the Order Used For Authentication. You can optionally add another authentication policy (using left and right arrow buttons) as a fallback method.


I also verified on the RADIUS server log (log #6) if the user (john-rad) was successfully authenticated.

No comments:
Post a Comment